
How to put your models, from Model Prep or another program, on your printer’s build plate and download the plate as one file with Model Print.
Model Print is being tested with a small group of dentists. Until testing ends, only they can use it; everyone else sees a short note on its page.
- What it does
- Before you start
- Step by step
- Arranging the plate
- The waiting list
- Settings
- What it costs
- Common questions
- More help
What it does
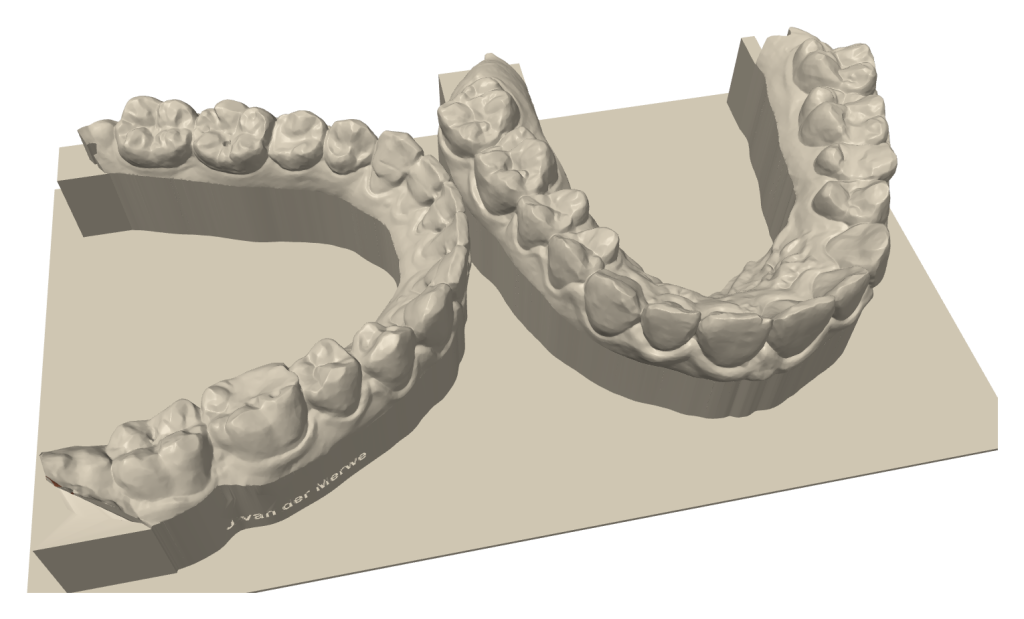
Model Print packs your models onto your printer’s build plate: models you made in Model Prep, or finished models from another program, such as aligner models exported by Medit. They go on with a safe gap between them, lying flat, standing upright or leaning back at any angle in between, turned so that as many as possible fit: two full arches lying flat can nest into each other. You see the plate from above, from the front and side, and in 3D, move, turn or lean a model by hand if you want, see what the resin costs, and download the whole plate as one STL file for your printer’s software. Models that don’t fit wait for the next plate.
Before you start
- An approved practice account: log in.
- Your models as STL files: the ones Model Prep downloads, or finished models from another program, such as aligner models exported by Medit. A finished model is closed and has a flat base: Model Print stands it on that base and turns its front teeth to the front. A raw scan from the scanner goes through Model Prep first.
- Your printer in the list: fifteen printers from Asiga, Formlabs, SprintRay, Phrozen, Elegoo, Anycubic, HeyGears and Ackuretta are built in. Yours missing? Use Printer not listed? Ask us to add it.
- A computer with a current browser: Chrome, Edge, Firefox or Safari.
Your patient’s privacy. Everything happens in your browser: the models and the job name never reach the website. Your account keeps only your printer, the gap and your resin price.
Step by step
- Type a job name (required), for example the date or the patients on this plate. Each word starts with a capital as you type. It is used for the file names only.
- Choose your printer. Model Print remembers it for next time.
- Choose Flat, Upright or a Model angle. Flat (0°): base on the plate, teeth up. Upright (90°): each model stands on its back on a small foot that you snip off after printing; the most models fit on a plate. In between, set the Model angle with the slider or type the degrees: the models lean back on a foot. Every model takes this angle unless you lean it yourself (see below).
- Add models: drop the STL files on Add models, or click it to choose them. Several at once is fine. Model Print packs them on the plate straight away.
- Check the plate in Plate View (Editable) and the 3D Preview, and arrange it if you want (see below).
- Type your resin price under Cost to see what the plate and each model cost.
- Press Download STL and open the file in your printer’s software: the models sit where the plate view shows them. If the plate uses a credit, Model Print first asks Ready to download this plate?: check the plate, then press All in order: download (1 credit), or Go back and check to use nothing. Download plate map gives a picture of the plate with the models numbered, to keep with the print.
- After printing, press Clear the printed plate: the printed models leave, and the next plate starts from the waiting list. New job clears the plate and the waiting list.
Arranging the plate
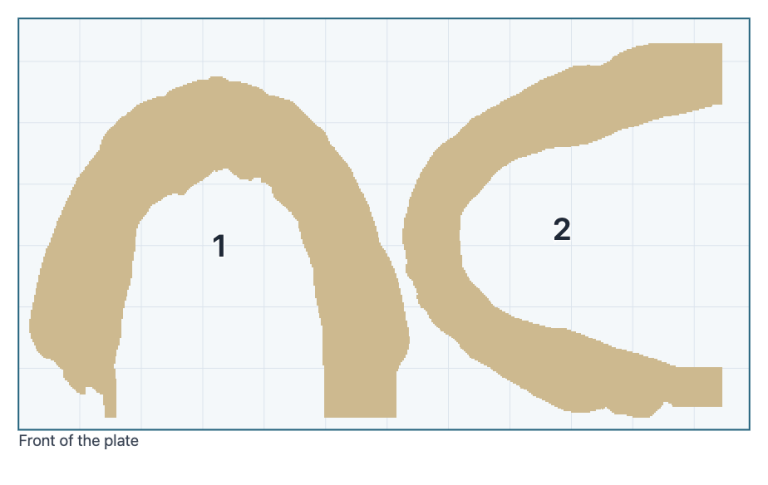
- Select a model: click it in the plate view. Move it: drag it in the Top view.
- See the plate from three sides with the tabs Top, Front and Side on Plate View (Editable). Front and Side show how each model stands and how tall it is, with your printer’s height limit as a red dashed line.
- Turn it 15° at a time with Turn ↺ and Turn ↻, or turn it round 180° with Flip.
- Lean it with Lean −5° and Lean +5°, or type the degrees (0 to 90) in Angle. Or drag it up or down in the Side view: the outline tilts and the angle shows as you drag, and letting go applies it (let go outside the view to cancel). The line beside the tools says, for example, Model 2: 60° (own angle); Use Model angle puts it back at the angle the other models share. A model with its own angle stays as it is when you change the Model angle; if every model on the plate has its own angle, the plate stays as you arranged it, and waiting models that now fit are added to the free room.
- Edit in 3D: press Edit in 3D on the 3D Preview to select a model by clicking it there, and to look at the plate from the Front, Side or Top (Free leaves the view where you turned it). The selected model is ringed at plate level. Dragging still turns the view.
- Take it off the plate with To waiting list, or out of the job with Remove.
- Red means a model is closer than the gap to another model or to the edge of the plate; a lean can do this too, as a leaning model takes more room. Download STL waits until nothing is red; Pack again lets Model Print arrange everything afresh, each model at its own angle.
The waiting list
Models that don’t fit on the plate go to the Waiting list, with the note No room on the plate: moved to the waiting list. They wait there for the next plate. Next to each one, Add to plate puts it into any free room on the plate, and Remove takes it out of the job. Pack again also tries the waiting models.
The list is saved in this browser on this computer only: it is still there tomorrow on the same computer, but clearing the browser’s site data removes it.
Settings
| Setting | Choices | Default | What it changes |
|---|---|---|---|
| Printer | fifteen printers, by brand | Asiga MAX UV / MAX 2 | The plate size and the height limit. Changing it checks every model again. |
| Model angle (Flat / Upright) | 0° – 90° (Flat is 0°, Upright 90°) | 0° | How far the models lean back. The steeper, the more models fit; a leaning or upright model stands on a foot you snip off. A model can have its own angle (see Arranging the plate). |
| Gap between models | 0.5 – 5 mm | 1.5 mm | The closest the models come to each other and to the edge of the plate. |
| Resin price | your price per litre | empty | Shows the cost of the plate and of each model (an estimate: supports and failed prints are not included). |
The printer, the gap and the resin price are remembered on your account. The Model angle and each model’s own angle are kept with the job in this browser.
What it costs
- Free: adding models, packing, the plate view, the 3D preview, the cost and the plate map.
- One credit per plate when you press Download STL. The same plate again within 24 hours is free.
- You confirm before a credit is used. Model Print asks you to check the plate first. Once you have confirmed, the credit can’t be refunded for a mistake on your side, such as a model left off or placed wrongly, or the wrong printer or angle. Subscribers aren’t asked.
- Or a subscription that covers Model Print, for unlimited plates.
- The Credits and plans box on the tool shows how many credits you have, with the credit packs and the subscriptions you can buy; the checkout opens in a new tab and your plate stays where it is.
- Testers use it free while testing lasts. Prices are on the Pricing page.
Common questions
My file holds both models, saved in the bite.
Some programs save the upper and lower together, one on top of the other. Model Print splits such a file into its models, named … – lower and … – upper, and puts each on the plate by itself, standing on its own base.
My STL file is not accepted.
The line beside the file says why. This looks like a raw scan: it has an open edge. means the file comes straight from the scanner: prepare it in Model Prep, then add the model Model Prep downloads. This model has no flat base to stand on. means the model needs a base: give it one in your model program, or prepare the scan in Model Prep.
Model Print couldn’t tell which end of this model is the front.
Model Print finds the front teeth from the shape of the arch. When it can’t, for a model that isn’t a full arch, it leaves the model as your program saved it, standing on its base. Look at it in the Side view before you lean it: it should lean back, away from the front teeth. If it leans the wrong way, print it flat (0°), or turn it in your model program so the front teeth point forward.
A model from another program costs more resin.
Models from other programs are often solid; Model Prep makes them hollow. The cost is worked out from each model’s real volume, so a solid model shows its real, higher cost.
Only one model fits on the plate.
A full arch lying flat fills most of a small plate. When models don’t all fit, Model Print turns them in 15° steps to nest them into each other, so two full arches often fit flat on a plate like the Asiga MAX UV’s. Choose Upright or a steeper Model angle to fit more, or print the rest from the waiting list on the next plate.
A model won’t lean further.
At that angle it would be taller than your printer can print. The message names the steepest angle that fits, for example Too tall for this printer at 90°: 70° is the steepest that fits. The model keeps its angle and its place. Choose that angle or less, or a printer with a taller build.
Download STL is greyed out.
The line under it says why: add models to the plate, move the red models apart (or press Pack again), or type a job name.
The download failed after the credit was used.
The plate is paid for: press Download STL again within 24 hours at no charge.
My waiting list has gone.
It is kept in the browser you used, on that computer. Another browser or computer, a private window, or clearing the site data starts with an empty list.
More help
Use the Help us improve Model Print box under the tool to report a problem, suggest something or ask for your printer; you can add a picture or screenshot to show what you mean. The Video training page has short videos on the software tools, or contact us.